Sunday, September 6, 2015

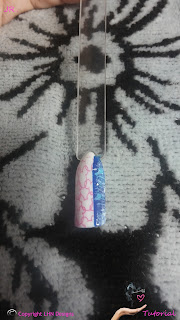
Mickey wears jeans- Tutorial

This design was inspired by JauntyJuli. I adapted it to my stamping plates and came out with this design.


I've been designing nails for 15 years or more. For the last six to eight years I used almost everything you can imagine for nail art but nail polish. This is like going back to basics but having something on my side. Nail Stamping! Almost ready to use designs that demand less working time and you get beautiful and perfect designs each time without the worries of  nails not being uniform. 

What you will need:

For this tutorial I used Jr.5 stamping plate from My Online Shop


Base Coat
Top Coat (I used Glass Kote- Charlotte)
White ( I used Snow Me White -Sinful Colors)
Blue -Three Shades ( I used Colorina  10,37 and 97)
Pink - This color should be stamping quality( Iused Wet n' Wild Megalast 209C- Candy-licious)
Your favorite stamper and scraper
Fan brush
Detail Brush (20/0)
Porous sponge and tweezers (optional)
Acetone
Metal Studs
A small mirror or color palette
Washi Tape

Step by step

1. Apply  base coat
2. Now add a coat of white, it should be a white that covers mostly on one coat, as we will do a few layers more and the final result should not be too thick.
3. Add a layer of top coat. I use Charlotte's Glass Kote (local brand). I really like this top coat because it dries with a glassy finish. It looks a lot like uv gel top coats and the best thing is it evens the polish giving you a perfect surface to stamp on. Plus if you mess up you can carefully remove your stamp with non acetone polish remover, re-stamp and add a top glass kote layer and it wont affect the quality and beauty of your design.

4. Stamping time! with the pink  polish I will stamp from Jr.5 stamping plate.


5. Apply top coat and let dry completely. Make sure is completely dry because the success of the next step.
6. With a piece of washi tape cover 3/4 of the nail making sure its perfectly adhered in the nail to avoid polish drips.

7. Apply a coat of the middle tone blue (Colorina 10 Neon Blue) on the unprotected 1/4 of the nail. Remove washi tape before it dries. Let dry completely.


8. Using a fan brush do some dry strokes with light blue horizontally and vertically. Repeat with the darker blue and white, cleaning the brush between colors. Keep doing this until you feel satisfied with the results.
9. This step is optional but it gives the design a realistic jean appearance. With a small piece or a porous sponge, create one or two white spotting areas on the jean design.


10. With the detail brush (20/0) do some random fine lines with light blue to accentuate the denim detail.
11. Apply top coat.

12 Add a vertical line of metal studs before the top coat dries. Let dry completely and add another layer of top coat to secure the studs in place.


As variations you might divide the nail diagonally, you might do a full jean nail or you might just do a white nail with pink stamping as I did on this set. You might paint pockets and everything you feel makes it look denim like. Do random styles on your nails, just be creative and have fun. Let me know if you try this design. Feel free to link your instagram pictures or facebook pictures on the comments below. 


Saturday, September 5, 2015

My Online Shop Stamping Plate JR. 5 Swatch and Review


This is the first review for my Messy Mansion and My Online Shop Hauls. This time I'll be reviewing Jr. Plate 5 and Messy Mansion Double Stamper Deluxe.

I have to say I absolutely love the stamper. I had to prime it though but after I did it picked up just fine. For this review I used only the white stamper head. 
Overall plate Jr.5 is a great add to any collection. Most of the designs have a crisp perfect transfer. I used Sinful Colors Black on Black nail polish for this review. 


I also have to say that the thinner detailed designs were kind of hard to fully pick up , I did have success after trying several times but it was a bit frustrating. Still I love this stamping plate. My advise for the thinner detailed designs, scrape only once and work it out fast.


And the final outcome (On Paper)


This is a really nice stamping plate. I worked some beautiful designs with it. I will share a tutorial soon on this blog. Stay tunned!


Friday, September 4, 2015

My Online Shop Haul


Jr. stamping plates

There is a huge selection of stamping plates on the market. As I kept looking for videos and blogs, I wanted more stamping plates. I loved each video tutorial I saw, I wanted to be able to change my design every day, it's overwhelming the huge amount of brands, styles, and designs that can be found online.Variety is never a problem with stamping. I am a Disney and Sanrio fan, so I decided my first stamping plates had to be this theme-related.
I was so happy I found the site on Etsy, but the excitement vanished when I found a message on the etsy store. She was going to be away until September! I was so sad. Then I searched for my online shop on Facebook, there it was, she accepted my friend request OMG! I was so happy!!! I asked if  there was a way to order online, and she told me the store was relocated to store envy. So I created my account on the site and ordered those beautiful stamping plates. I ordered Jr.5, Jr.25, Jr.27 and Jr.33.

The delivery time took only 5 days and I loved the plates from the first time I saw them. Every design is very detailed. These stamping plates are awsome! Great costumer service too!


Messy Mansion Haul


I've been a Nail technician for a long time, but I am quite new to nail stamping. I wanted to have every tool I would need. I saw this Messy Mansion accessories kit 2.0, and saw good reviews about it, it wouldn't hurt to order one. It's supposed to make stamping easier and cleaner, so why not? I also needed a stamper, I added the Deluxe double ended stamper to my order.


Messy Mansion is a company based in Australia, and they do their domestic orders from Australia,but the best thing is they ship international orders from their warehouse in North Carolina,USA. And I live in a USA Territory. The delivery took 6 days which made me really happy because I buy things online mostly from ebay , and the delivery time from most of the sellers is almost eternity, just joking, but they do take quite a while.
Here is my haul:


Thursday, July 23, 2015

Pop-arazzi haul color swatch and review


Results after applying two coats (three on Shell Me More and Teeny Yellow Bikini)

I am a very demanding person when it comes to top coats. Because of that I am almost married to UV and LED top coats for nail art. But as you know UV and LED top coats are only wearable over acrylics, gels and gel polishes (one type for each). These top coats can't be worn over a regular polish mani, sadly, it will start to chip the very first day. That is the reason I stopped working with nail polishes. But if I absolutely had to work with polishes because a client absolutely wanted it (sorry for the word duplicity), there is only one top coat I trust. And that is Charlotte's Glass Kote (a local brand). I love this one because as the name implies it dries as a liquid glass layer. It is really shiny and protects the nail polish from chipping for longer time than regular top coats. It looks exactly as a UV or LED cured top coat.

Having said that, I'll start my review with the top coat for this brand , Clearly Thinking. This top coat has its tricks. The first time I used it it apparently had an attitude. It did spread even, but tended to shrink and ended up creating some roughness over the nail polish. I have to make clear that I applied it over another's brand white polish swatch I had already dry. I could think one of too things as the white polish was completely dry and even, either the two brands did not make good chemistry, or the temperature that day affected the drying process of the top coat.
 The second time I tried it I applied it over the pop-arazzi first swatches I made and it dried just fine. Again it was a different day.
Today I tried it in the morning for a third time, and I applied it to a naked artificial nail. It dried beautifully . It applied evenly and dried with a beautiful shine. It's the first top coat I like besides Glass Kote (but not more) I think I have to put it to the test for durability and chipping. And as advice, do not use too much of it. Just a regular, perfect application.

Color results after applying one coat


Shell Me More, OMG! this color is responsible for the existence of this haul. the color haunted me. Its like a minty green, but not that green, a little bit more on the baby blue side, itis so sweet. But.... the formula is too thin, I had to apply three coats to make it opaque, so I recommend using a white base. Either way it is a lovely color.
Teeny Yellow Bikini, as most yellows the formula is really thin, almost sheer. I couldn't get an even color with just one coat. When I applied the second coat it started to look even but still a little too sheer for being a creme polish. It was on the third coat that color started to pop, but a bit uneven. It needs a white base coat for sure. Beautiful color though!
Lime-ousine Ride, this is one of the most beautiful greens I've seen at drug stores. It reminds me of ONS colored acrylics I used to sculpt leaves, even Organic Nails has a color like that which I also love. This is a lime-grassy light green. It's a creme polish, but its formula is a bit thin. Despite this it was possible to get it opaque in two coats.
Don't Need No Romeo, this is a strong color. Its like a hunter green, and a really dark one, i couldn't difference it from the black until I did swatch it . It has a light formula but I was able to get it completely opaque in two coats.
Curfew, this is a black polish. It covered pretty much in one coat,. I was able to get it completely opaque in two coats.
Break His Heart, the hue on this color got me, it's kind of a type of  burgundy  but more on the purple side, it is a really deep shade with almost a blackish shade. It has a really good creme formula, but still I needed two coats to make it opaque and take it similar to the bottle tone.
Carmella Latte, reminds me of toasted caramelized nuts. This color has its own personality. I have to say its one of my favorites on this haul. It's great formula covered almost in one coat. I decided to add another coat just to intensify the color but in my opinion is a nail polish that can be worn in just one coat. 
Mango Colada, although this is a nice colors it's not one of my favorites from this haul. It reminds me of a papaya "champola" which is a local milkshake made out of milk and papaya (obviously). The thing is I hate "champola", and that is why I don't like the color that much. But as I said it sure is a nice color and should be great on anyone else's nails. It has a thin formula, so two coats were needed to make it completely and evenly opaque.
Tropical Tango, it's a hit! This one is an intense orange color and has a great formula. It covered evenly and got opaque on one coat. Even the intensity of the color was perfect in one coat. I just love this nail polish.
Reddy, Set, Action!, this is a bright red. It's formula is great. It covers pretty much in one coat, almost got opaque in one. I added a second coat just to intensify the color because it was pretty opaque already with one.
Mind Your Manners, beautiful deep magenta. It has a thin formula. Although its a bit sheer, I was able to get it completely opaque in two coats.
Razz Baby, this one is another shade of magenta, this lovely color has a great formula, another one  of my favorites on this haul (I think I could make a top five out of these). It got opaque in one coat, you might add another coat just to intensify the color but it can be worn in one coat.
Flamingo-go, this is a bright magenta. It covered pretty much in one coat, just added another coat to even and intensify the color.
Call Me a Cab, great formula for a neon. I was able to get it opaque in just two coats.
Blushing Beauty, it has iridescent and pink micro glitters in a pink jelly base. It covered pretty much everything in just one coat with an even glitter coverage. I decided to add a second coat to intensify the color. I recommend using a good quality top coat as it has some texture.

Color results after two coats

Last but not least, Cute-icle cuticle oil. I loved this cuticle oil, besides its cute packaging it has a nice fruity scent and its absobed smoothly.
Overall I can say this is a good brand to buy on a budget.


 My Top 5 from this haul

5. Teeny Yellow Bikini
4. Lime-ousine Ride
3. Shell Me More
2. Tropical Tango
1. Carmella Latte


Pop-arazzi Haul


Funny being a qualified nail tech for quite long time now I decide to share a drug store nail polish brand haul. Well after buying really expensive acrylics, UV and LED gels and a few brands of gel polishes I went back to basics. I feel almost like a newbie and I am walking my first baby steps back into nail polish and traditional nail art. In the last two weeks I fell in love with a brand I discovered in CVS while I was looking for polishes I could use for nail stamping.
Honestly it was the packaging what got my attention. Those cute polka dots drove me crazy. Then I discovered a few good colors I decided to try. They were on sale and I had some CVS extra bucks so I ended up spending $6.00 for my first purchase and a little bit more for the second one.


From the center up and going clockwise:

1. Cuticle Oil- Too Cute-icle
2. Top Coat- Clearly Thinking
3. Shell Me More
4.Teeny Yellow Bikini
5.Lime-ousine Ride
6. Don't Need No Romeo
7.Curfew
8. Break His Heart
9. Carmella Latte
10. Mango Colada
11. Tropic Tango
12. Reddy, Set, Action!
13.Mind Your Manners
14. Razzy Baby
15. Flamingo-go
16. Call Me a Cab
17. Blushing Beauty

Once I tried the first polishes I brought home, I loved the colors, the formula and some of them got opaque in only one coat, so I decided I had to get more. These colors are the ones I could find on the nearby CVS. I am still looking for more colors because I absolutely loved them. I am working on the review so....stay tuned!!!


A little disclaimer

1. Products I use or share in this blog are purchased with my own money and I will share my honest opinion of the products and how they work for me ( or not). I live in the tropics, so I'd like to say that maybe what works for me doesn't work for everyone and vice versa.
2. I am not related and I do not represent any of the companies whose products I use or share in this blog. I might try to find some logos of the products I use just for reference and illustration purposes on my blog, but the logos copyright solely respond to the companies owning them I do not try to infringe any copyright or the respective laws.
3. As Nail Technology requires a diploma and a licence in most places around the world. I wont be sharing the process of structure and chemical application, nor manipilation of chemicals on the natural nail. This includes and it's not limited to electric or manual filing . I will focus on the artistic part, and I will share some of my fun designs with everyone. Enjoy and have fun!!!

Nail art

As a stay at home mom the only "for me" time I had was the hour and a half or two hours I spent in the beauty salon getting my nails done. My nail dresser was a star. She always had a new design in the only color I wanted on my nails. Any shades but only purple. But then I moved back to my hometown. I did not go to a salon for a while because I missed my nail dresser. I tried going to get my nails done where I used to live but after a while it was a bit time consuming getting the kids dressed to travel more than an hour just to get my nails done. So I decided to stop.
Then there was a wedding. How could I possibly go to a wedding with my nails looking like that? I looked for a local salon and I got an appointment. Big mistake!!! I got the most horrendous pink and white full set I had seen in my entire life. My nails looked like fans and she used white nail tips. For the love of God!!! White tips!!!! I wanted pink and white acrylics. So that was goodbye to salon nails.
I was frustrated. As time went by I wanted to get my nails done, but I didn't want to loose any more time or money. So I told myself, "what can possibly go wrong?" I liked arts , painting, creating things, my creativity was not a problem, it couldn't be so hard. I got a basic kit and started doing my own nails, then I went to beauty school. I won't lie it was a hard and long process but it was worth it. Sixteen years later I've never had a nail disease. I did my own nails with my own designs. I learned every single skill in nail evolution from nail polish to LED gel. Through the years Nails had become my best source of creativity.It's my passion, It's what I am made for. In different times and for different reasons I tried to quit, but after a year or two I ended up going back to nails. Well this time I decided to go on myself and share my adventures on nail art with everyone through this blog. I'll be sharing my designs, some process videos, some diy's but only as a hobby, just for fun. This won't be an educational blog. I will just share what works for me and my impressions on the products and tools I use. Stay tuned.